Weather Website using Nodejs, Express
In this tutorial we will learn to build a simple website where users can type city name and get real-time weather data on screen using Nodejs, Express, OpenWeather.
You may see the live demo of what we are building. Check out the Live Demo.
Prerequisites
Node.js: Visit official Node.js website to download and install.
OpenWeatherMap.org account. It is a quick 20 second signup. In project setup, I go through all the setup details.
Project Setup
All the code from this article is available for download on GitHub.
Once all the prerequisites software is set up, we can start our project. First create an empty directory named weather-app and open the terminal and write the following command for node app.
npm initNow enter the required details for Node’s package.json or hit enter until the end to initialize our project.
Within our weather-app directory, create a file named server.js.
Creating Our Server
First thing we need to do is get our server up and running. For this we will use Express. It is a minimalist web framework for Node.js that deals with exploring various code with which we need on a frequent basis. Express make it very east to create and run a web server with Node.
To install Express, write the following command in terminal:
npm install express --saveOnce installed, we require the express package. Then we create an instance named app by invoking Express. Write the follwoing content in server.js file:
var express = require('express');
var app = express();

app.get('/', function(req,res){
  res.send('Hello World!');
})

app.set('port', (process.env.PORT || 8000));
app.listen(app.get('port'), function(){
      console.log('Server listening on port ' +app.get('port'));
});
Here we use app.get('/', ...) to specifically focus on root URL. If we vist root URL express will send respond “Hello World!”.
The app.listen(...) shows we are creating a server that is listening on port which we will provide.
In above code we use process.env.PORT to set the port to the environment port variable if it exists. Otherwise, we’ll default to 8000, which is the port we’ll be using locally. This gives you enough flexibility to switch from development, directly to a production environment where the port might be set by a service provider like, for instance, Heroku.
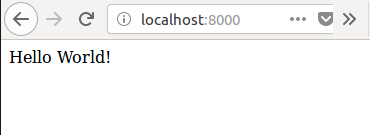
Now we can test our sever by writting the follwoing command:
node server.jswhen you hit enter, you will get “Server is listening on 8000 port”, open your browser and visit “localhost:8000”, you should see Hello World!.
Awesome! we have created a server using Node.js and Express!
Setting Up Index View
When someone visits our root route, we have a option to respond with text or HTML file. To render HTML file we will use EJS (Embedded JavaScript). EJS is a templating language.
A template engine enables you to use static template files in our application. At runtime, the template engine replaces variables in a template file with actual values, and transforms the template into an HTML file sent to the client. This approach makes it easier to design an HTML page.
To use EJS in our project, we must install it using:
npm install ejs --saveNext we will require ejs package and set up the templating engine, by writting the following code:
app.set('view engine', 'ejs');
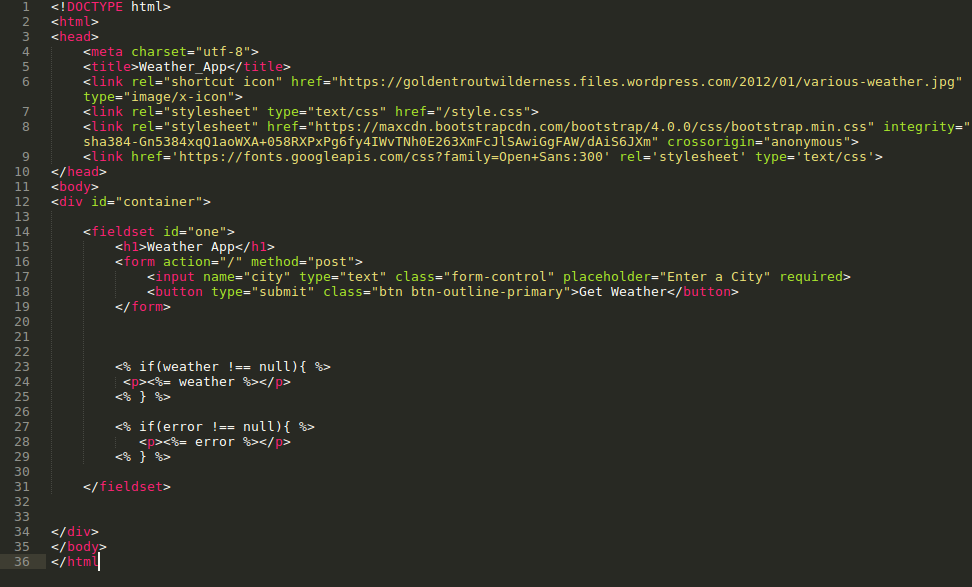
EJS is accessed by default in the views directory. So create a views folder in your directory and inside it create index.ejs file and add the following content:
<!DOCTYPE html>
<html>
<head>
<meta charset="utf-8">
<title>Weather_App</title>
<link rel="shortcut icon" href="https://goldentroutwilderness.files.wordpress.com/2012/01/various-weather.jpg" type="image/x-icon">
<link rel="stylesheet" type="text/css" href="/style.css">
<link rel="stylesheet" href="https://maxcdn.bootstrapcdn.com/bootstrap/4.0.0/css/bootstrap.min.css" integrity="sha384-Gn5384xqQ1aoWXA+058RXPxPg6fy4IWvTNh0E263XmFcJlSAwiGgFAW/dAiS6JXm" crossorigin="anonymous">
<link href='https://fonts.googleapis.com/css?family=Open+Sans:300' rel='stylesheet' type='text/css'>
</head>
<body>
<div id="container">
<fieldset id="one">
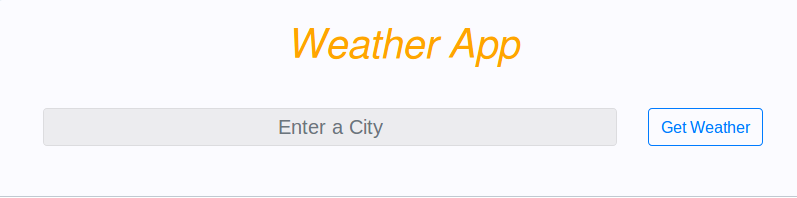
<h1>Weather App</h1>
<form action="/" method="post">
<input name="city" type="text" class="form-control" placeholder="Enter a City" required>
<button type="submit" class="btn btn-outline-primary">Get Weather</button>
</form>
</fieldset>
</div>
</body>
</html>Adding CSS file
To add css create public/style.css file in root directory of project and add custom css ( You may copy css from Github ).
Express would not allow access to this file by default, so we need to expose it with the following line of code:
app.use(express.static('public'));
This code allow us to access all of static files within the public folder.
Once you have done this, update the app.get('/', ...) function to render the index HTML file. In server.js file write the following content:
app.get('/', function(req, res){
  res.render('index');
})
When working with templating language, we use
res.renderto render our view, which send the equivalent HTML to client.
Now again start your server using node server.js and open browser, visit localhost://8000 and you should see our index.ejs file.
Real quick, here’s what our file structure should look like :
  | -- weather-app
    | -- node_modules
    | -- public
      | -- style.css
    | -- views
      | -- index.ejs
    | -- package-lock.json
    | -- package.json
    | -- server.js
Setting Up Post Route
In server.js we have set a get route and create our server. But our application to work, we need a post route aw well. In index.ejs file, we have a submitting form which has POST request at / route: <form action="/" method="post">. So we set post route and using this we access the name of city provided by the user. For this we use an Express Middleware.
Express can make a use of Middleware ( functions that have access to req and res bodies) in order to perform more advanced tasks. Here we are going to make use of the body-parser middleware. body-parser allows us to make use of the key-value pairs stored on the req-body object. In this case, we’ll be able to access the city name the user typed in on the client side.
To install body-parser write the follwoing command in terminal:
npm install body-parser --saveOnce installed, requie the package in server.js and then make use of our middleware with the following lines of code in server.js:
var bodyParser = require('body-parser');
//..
//..

app.use(bodyParser.urlencoded({ extended: true }));
Finally, make the post request and using this we console the value of ‘city’ typed by user.So write the follwoing content in server.js file.
app.post('/', function(req,res){
  res.render('index');
  console.log(req.body.city);
})
Lets test it by restarting the server using node server.js command. Open your browser and visit localhost://8000, type city name and hit enter. If you go back to your command prompt (terminal) you should see the city name. Awesome we have successfully passed data from client side to server.
Setting Up OpenWeather
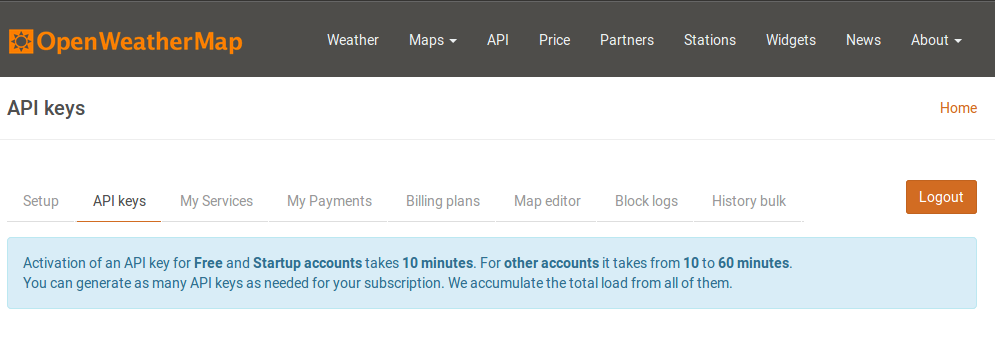
For this project we’ll be using the Free Current Weather API. Click here and sign up for an account. All you need is an email address and password.
Once signed in, select the API keys tab. From Here you can Create a Key on the right hand side of the page. Enter a name (anything works) and select generate. Your API Key will appear on the left. Copy this key for later. Awesome now we have our API key.
Making API call
To make our API call, we will use famous npm module called request. It simplifies the code needed to make an http request in node.
Install request using command:
npm install request --saveOnce installed, require package and add the starter code:
var request = require('request');

request(url, function(err, res, body){
  if(err){
    console.log('Error: ', err);
  } else{
    console.log('Body: ', body);
  }
});
In above code first we require the request package, then we pass a target URL and request returns a callback function with three arguments: err, res, body. Then we check error in our request, If it’s found console errors otherwise console the entire contents of respone body.
Awesome! so what is the url we’re making the request to?
By reading the OpenWeatherMap Documentation, we are able to determine the url, which should make a request: http://api.openweathermap.org/data/2.5/weather. The URL also have two other required parameters. Query parameters are key/value pairs that allow us to pass in data to a URL. In this case we include city name and our API key. Add the follwoing content in server.js file:
let request = require('request');

let apiKey = '*****************************';
let city = 'delhi';
let url = `http://api.openweathermap.org/data/2.5/weather?q=${city}&appid=${apiKey}`

request(url, function (err, response, body) {
  if(err){
    console.log('error:', error);
  } else {
    console.log('body:', body);
  }
});
Now in server.js file create a variable named apikey and assign it the string value of our API key.Then create a variable named city and assign it the string value of city, then create variable url and assigned it the OpenWeatherMap url with our two required query parameters.
Query params starts with
?(question mark). Different key/value pairs are separated with an&ersand.
The returned jumbled text from above url is in JSON form. So first thing we need to work is convert into a JavaScript Object.We can make this conversion using one line code:
let weather = JSON.parse(body);
Now we have a JavaScript Object, we can access data within object using dot or bracket notation. Below, we construct a message string by accessing data within our weather object:
let message = `It's ${weather.main.temp} degrees in
               ${weather.name}!`;
console.log(message);
Note : OpenWeatherMap sets its temperature to Kelvin default. So we need to add another query parameter. If you want temperature in Celsius add:
units=metricand if in Fahrenheit useunits=imperial.
Awesome, we have successfully setup the OpenWeather account and understand how to make api call using request package. Next we will modify post route handler function.
const request = require('request');
const apiKey = '*****************';
//...
//...
app.post('/', function (req, res) {
  let city = req.body.city;
  let url = `http://api.openweathermap.org/data/2.5/weather?q=${city}&units=metric&appid=${apiKey}`
request(url, function (err, response, body) {
    if(err){
      res.render('index', {weather: null, error: 'Error, please try again'});
    } else {
      let weather = JSON.parse(body)
      if(weather.main == undefined){
        res.render('index', {weather: null, error: 'Error, please try again'});
      } else {
        let weatherText = `It's ${weather.main.temp} degrees in ${weather.name}!`;
        res.render('index', {weather: weatherText, error: null});
      }
    }
  });
});
Lets understand what we have done. First we access the city name entered by user using re.body.city, then create a url string, using which we make our api call.When we receive our callback, the first thing we’re going to do is check for an error. If we have an error, we’re going to render our index page. But notice that I’ve also added in a second argument. res.render has an optional second argument, an object where we can specify properties to be handled by our views ( index.ejs ).
Now when we have no API error, we can parse our JSON into JS Object. Then we check for (weather.main == undefined). This will only happen when user entered a string which isn’t a city (‘1’, ‘abcd’). In this instance, we’ll render the index view, and we’ll also pass back an error.
If (weather.main != undefined) then we can finally send back weather to client.
Last thing to do at this point is update index.ejs. Make use of all these variables we sent back with our res.render. As these variables are not available at client side, here EJS works. We have total three possible scenarios :
 1.  {weather: null, error: null}
 2.  {weather: null, error: ‘Error, please try again’}
 3.  {weather: weatherText, error: null}
We need to make some changes in index.ejs file to handle these scenarios. Add following content below the </form> tag and above </fieldset>
<% if(weather !== null){ %>
  <p><%= weather %></p>
<% } %>

<% if(error !== null){ %>
  <p><%= error %></p>
<% } %>
Here’s what your index.ejs should look like:
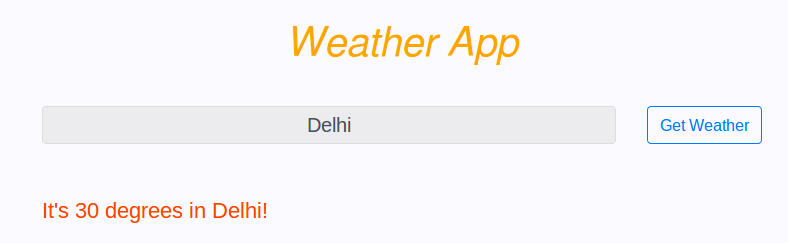
Great! we have done our project. Now start your server and open browser. Visit localhost://8000 and enter city name, you should see the weather appear on your screen! It should be like this:
Conclusion
In this article we have just built a website that makes API call and responds to the clients in real time!