Learning Docker - Part 1
Docker is a platform for developers to develop, deploy, and run applications with containers. Deployment of applications using linux containers is called containerization. Containers allow developers to pack up an application with all its libraries and dependencies, allowing them to be portable among any system running Linux.
Containers are not new, but momentum and ease around Docker’s approach have pushed them to forefront.
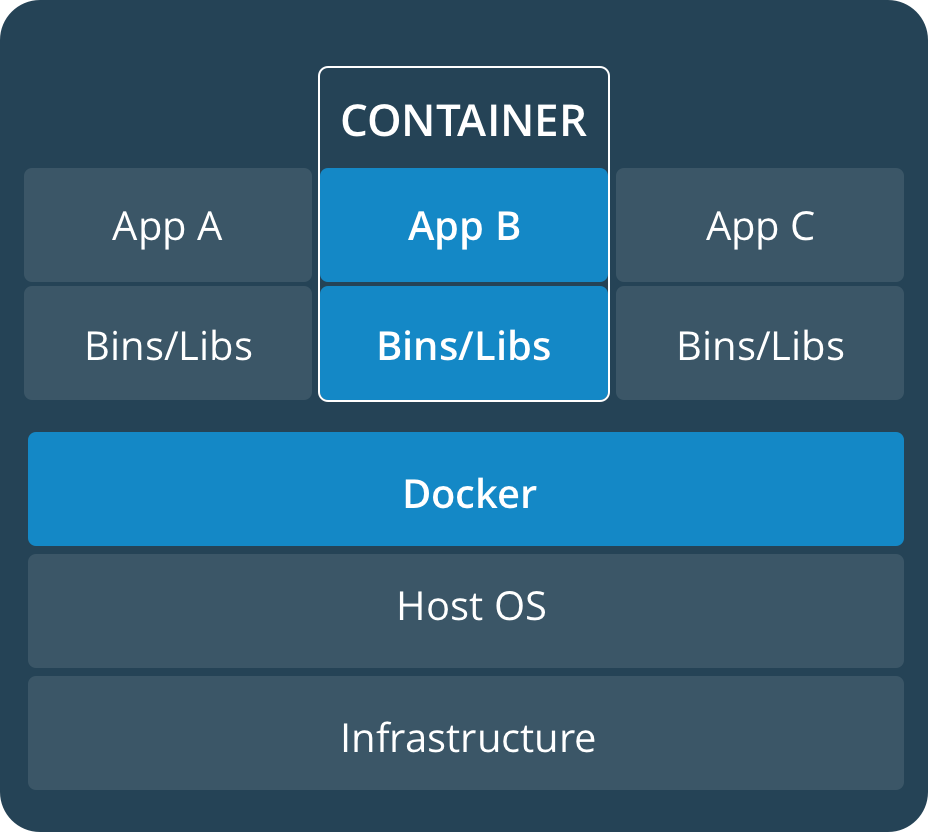
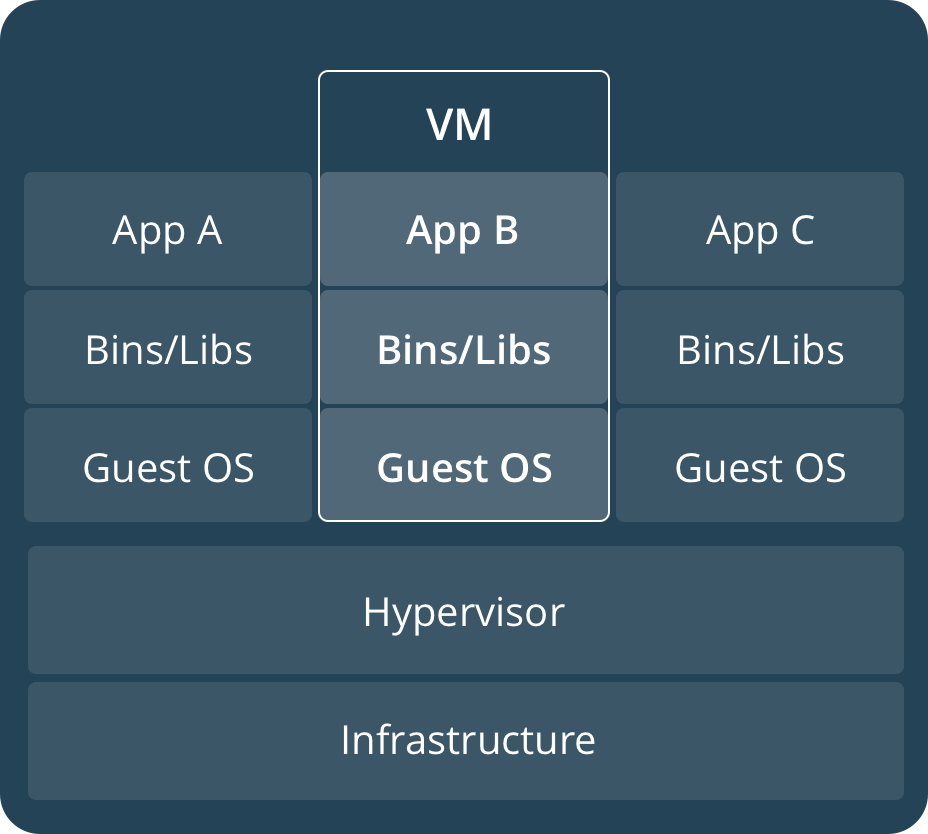
Containers vs VMs
A container runs natively on Linux and shares the kernel of the host machine with other containers. It runs a discrete process, taking no more memory than any other executable, making it lightweight.
By contrast, a virtual machine (VM) runs a full-blown “guest” operating system with virtual access to host resources through a hypervisor like virtualbox. In general, VMs provide an environment with more resources than most applications need.
Installation
Windows
Windows 10 Pro/Enterprise Users
Install Docker for Windows, follow instructions at the Link
Windows 10 Home, Windows 8/7/Vista Users
Install Docker Toolbox, follow instrunctions at the Link
Linux
Head over to Docker installation page for distro specific instruction, Link.
After installation follow these steps.
Testing Installation
Windows Users Only
i. Open Kitematic(Docker Toolbox) or Docker for Windows app, depending on your installation type.
ii. In
PowerShellcommand line, Rundocker-machine env | Invoke-ExpressionAll Users, Run
docker --versionto ensure that you have a supported version of Docker.$ docker --version Docker version 18.03.0-ce, build 0520e24302Run
docker infoto view more details about your installation.$ docker info Containers: 58 Running: 0 Paused: 0 Stopped: 58 Images: 7 Server Version: 18.05.0-ce Storage Driver: aufs Root Dir: /mnt/sda1/var/lib/docker/aufs Backing Filesystem: extfs ...Linux Users, to avoid permission errors (and the use of
sudo), add your user to the docker group. Read more
Docker hello-world
Run the hello-world image.
$ docker run hello-world

Unable to find image 'hello-world:latest' locally
latest: Pulling from library/hello-world
9bb5a5d4561a: Already exists
Digest: sha256:f5233545e43561214ca4891fd1157e1c3c563316ed8e237750d59bde73361e77
Status: Downloaded newer image for hello-world:latest

Hello from Docker!
This message shows that your installation appears to be working correctly.
...
List the hello-world image that was downloaded.
$ docker image ls

REPOSITORY          TAG                 IMAGE ID            CREATED             SIZE
hello-world         latest              e38bc07ac18e        2 months ago        1.85kB
List the hello-world container (spawned by the image).
$ docker container ls -all

CONTAINER ID        IMAGE               COMMAND                  CREATED             STATUS                      PORTS                NAMES
a8a7ea59bcc3        hello-world         "/hello"                 3 seconds ago       Exited (0) 2 seconds ago                         zealous_montalcini
Images and Containers
In Docker, an image is an executable package that includes everything needed to run an application–the code, a runtime, libraries, and config files.
A docker image is built from series of layers, each layer representing instruction in images’s Dockerfile. Each layer except the last one is read-only.
A container is a runtime instance of image–what image becomes in memory when executed(that is, an image with a state).
We have an image, which is a set of layers as we describe. If we start this image, we have a running container of this image.
Dockerfile is the recipe, image is the mould and container being the yummy cake.
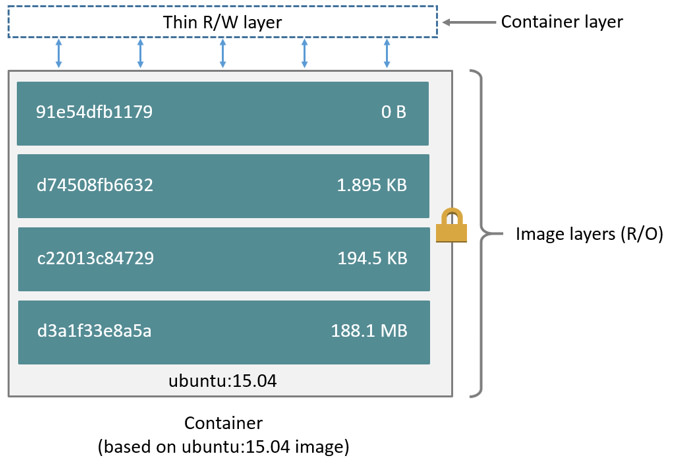
Each layer is only a set of differences from the layer before it. Creating a new container adds a new writable layer on top of the underlying layers. This layer is often called the “container layer”. All changes made to the running container, such as writing new files are written to this thin writable container layer.
Docker development environment
If we were to write a NodeJS app, our first priority isto to install Node runtime environment and additional packages as per our requirement.
With Docker, we can just grab a portable Node runtime as an base image, no installation necessary. Then our build can include the base image alongside the app code. Ensuring that our app, its dependencies and runtime, all travel together.
These portable images are defined by a Dockerfile.
Defining a Dockerfile
Dockerfile defines what goes on in the environment inside your container. In a Dockerfile we need to map the ports to outside world, specify the file we need to copy in the environment. However, after doing that, we can expect that the build of our app behaves exactly the same wherever it runs.
We will define a Dockerfile for a NodeJS express server.
Create an empty directory,
cdinto it and runnpm init.$ mkdir node-docker $ cd node-docker $ npm init This utility will walk you through creating a package.json file. It only covers the most common items, and tries to guess sensible defaults. See `npm help json` for definitive documentation on these fields and exactly what they do. Press ^C at any time to quit. package name: (docker) version: (1.0.0) description: Node docker app entry point: (index.js) ...Install express.
$ npm install express

npm notice created a lockfile as package-lock.json. You should commit this file.
npm WARN docker@1.0.0 No repository field.

+express@4.16.3
Create file
index.js, copy the following code into it, and save it.1 2 3 4 5 6 7 8 9 10 11 12 13 14 15// index.js const express = require('express') const HOST = '0.0.0.0' const PORT = '8080' const app = express(); app.get('/', (req, res) => { res.send("Hello, World!") }) app.listen(PORT, HOST); console.log(`Started Server on ${HOST}:${PORT}`)Create a file called
Dockerfile, copy-and-paste following content into that file.# Dockerfile # Use NodeJS runtime as parent image FROM node:8 # Set working directory to /app WORKDIR /app # Copy required files from current directory to into container /app directory ADD package*.json index.js /app/ # Install required packages RUN npm install # Make port 8080 available to world outside this container EXPOSE 8080 # Start the server when container launches CMD ["node", "index.js"]Now run the build command, to create a docker image.
$ docker build -t node-app ./ $ docker image ls REPOSITORY TAG IMAGE ID node-app latest 326387cea398-toption is used to tag our image with a firendly name, node-app in our case.
./specifies path of ourDockerfile, which is current directory in our case.Run the app, mapping your machine’s port 4433 to container’s pusblished port 8080 using
-p.$ docker run -p 4433:8080 node-app Started Server on 0.0.0.0:8080Go to url
http://localhost:4433in a web browser to see your served webpage.If you are running Docker Toolbox on Windows, use Docker Machine’s IP instead of localhost. In Docker Toolbox the container IP is behind Virtual Machine’s NAT, so to get to a
localhostport, we need to access it via Machine’s IP.To get IP, run
docker-machine ip. Now go tohttp://{IP}:4433. For example,http://192.168.99.100:4433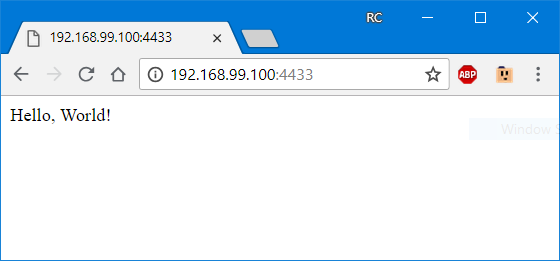
To run the app in background use
-doption.$ docker run -d -p 4433:8080 node-appTo view logs of this container
$ docker container ls

CONTAINER ID        IMAGE               COMMAND             CREATED              STATUS              PORTS                    NAMES
f66a80cfbf45        yoyo                "node index.js"     About a minute ago   Up About a minute   0.0.0.0:4434->8080/tcp   stoic_bassi

$ docker container logs f66a80cfbf45

Started Server on 0.0.0.0:8080
To stop the container
$ docker container stop f66a80cfbf45To view usage and options of a docker command, use
docker command --help. For example,docker image --help
To view usage and options ofdocker command command, use--help. For example,docker container logs --help
Conclusion of part 1
Thats all for this part. In next part we will learn how to publish our image to Docker’s public registry, Docker Hub and scale our application by running this container in a service.